Key Takeaways
- Most self leveling compound mistakes fall into four categories: poor bonding, surface cracking, uneven finish, and soft spots that never fully cure.
- A soft or tacky surface that you can mark with a fingernail means the compound must be fully removed before you re pour.
- Uneven areas can often be fixed without full removal by sanding down high spots and pouring a fresh skim coat over the affected zone.
- Skipping primer is the single most common cause of compound failure, as it causes the mix to absorb too fast into the substrate and lose its bond.
- The ideal temperature range for applying and curing self leveling compound is 50°F to 77°F (10°C to 25°C).
What Self Leveling Compound is and Why Mistakes Happen
Self leveling compound (also called self leveling underlayment or SLC) is a cementitious or gypsum based material that flows and flattens on its own after pouring.
It fills low spots on a subfloor and creates a smooth, flat surface ready for tile, LVT, hardwood, or other floor coverings.
The product has a working window of about 20 minutes from the moment you finish mixing. That short window, combined with the assumption that the material “does everything itself,” is exactly why mistakes happen. Most errors show up after the compound has cured, not during the pour.
Identifying what went wrong is the first step before fixing anything.
How to Diagnose Your Self Leveling Compound Problem Before Fixing It
Diagnose the specific failure type before touching the floor. Treating the wrong problem wastes time and materials.
Run through this four point check:
- Softness Test. Press a fingernail firmly into the surface. If you leave a visible mark, the compound has not cured properly and must be removed entirely.
- Adhesion Test. Tap the surface with a coin or solid rod and listen for a hollow sound. A hollow sound means the compound has debonded from the substrate underneath.
- Level Test. Lay a long straightedge or level across the floor. Gaps under the straightedge show low spots. Rocking means high spots are present.
- Crack Inspection. Look for hairline cracks, spiderweb patterns, or larger fractures. Hairline cracks are usually surface level shrinkage. Wide cracks often point to a substrate movement issue underneath.
| Problem Sign | Likely Cause | Repair Type |
|---|---|---|
| Soft or tacky surface | Wrong water ratio or too cold | Full removal and re pour |
| Hollow sound when tapped | No primer or dirty substrate | Inject bonding agent or remove and re pour |
| High spots or bumps | Dirt trapped or uneven pour | Sand down and skim coat |
| Low spots or valleys | Compound ran out or was too thin | Skim coat over the area |
| Surface cracking | Over watered mix or subfloor movement | Fill cracks, re prime, and skim coat |
| Bubbling or pinholing | No primer, air pockets in mix | Grind, prime, and re skim |
How to Fix Self Leveling Compound Mistake: Step by Step
Fixing a self leveling compound mistake follows a specific sequence. Skipping steps or changing the order causes the same failure to come back.
Step 1: Clear the Area and Gather Your Safety Gear
Wear safety goggles, work gloves, and an N95 or P100 respirator before doing anything. Removal and grinding produce very fine concrete dust that is hazardous to breathe.
Clear all furniture and door threshold strips from the work area. If you plan to grind, seal off doorways with plastic sheeting to contain dust.
Step 2: Remove the Damaged Compound
How much you remove depends on the failure type.
For a soft or fully unbonded layer: Remove everything. Use a chisel and hammer to break up the compound in sections.
Work in small areas and angle the chisel at 30 to 45 degrees to get under the material. Follow with a floor scraper to collect loose pieces. For large areas, a floor grinder with a concrete removal disc is faster and produces a cleaner result.
For isolated high spots or bumps only: Use an orbital sander or angle grinder with a grinding wheel to bring down the high area until it matches the surrounding floor level. You do not need to remove everything in this case.
For surface cracks with an otherwise solid bond: Stay on Step 3 without any bulk removal.
Continuously mist the surface with water while grinding or chiseling to reduce airborne dust.
Step 3: Clean the Subfloor Thoroughly
A clean subfloor is not optional. Dirt, old adhesive residue, paint overspray, drywall dust, and wax all prevent primer from soaking in. If primer cannot bond, the new compound will fail in the same way.
Vacuum the entire area first. Then scrub with a degreasing cleaner and rinse with clean water. Let the surface dry completely before moving to the next step.
For steel troweled concrete, which is too smooth for good adhesion, use a floor grinder with a diamond cup wheel to lightly profile the surface. The concrete should look slightly rough and matte, not shiny.
Step 4: Fill Existing Cracks in the Subfloor
Fill any cracks, voids, or expansion joints in the subfloor before priming. Use a concrete repair compound or a fast setting floor patch product.
Trowel it flush with the surrounding surface and let it cure fully according to the manufacturer’s timeline.
Do not pour self leveling compound over unfilled cracks. The compound will bridge them initially, then crack along the same lines once the subfloor moves or settles.
Step 5: Apply Primer Correctly
Primer is the most skipped and most important step. It controls how fast the substrate absorbs the compound, improves bonding, and reduces air bubbles rising through the mix.
Choose the primer recommended by the same manufacturer as your compound. Different brands are not always compatible.
Apply primer with a roller or brush in a thin, even coat. Let it dry to the correct tack level specified on the label, usually a clear or slightly glossy appearance.
Do not let it dry too long or collect dust. On very porous surfaces like bare concrete or plywood, apply a second coat and let it dry again.
If you are working on wood subfloor, prime specifically to stabilize the wood and prevent the compound from triggering swelling or shrinkage.
Step 6: Mix the Compound Correctly
Incorrect mixing is the second most common cause of failure. Too much water weakens the compound and increases shrinkage cracking. Too little water makes it stiff and prevents proper flow.
Use cold, clean water. Cold water extends the working window, giving you more time to pour and spread. Measure the exact water amount from the manufacturer’s datasheet. Do not estimate.
Pour the water into a clean bucket first, then add the powder slowly while mixing. Use a drill with a paddle mixer attachment at medium speed.
Mix for the full time specified on the bag, usually two to three minutes. Stop when the mix looks like smooth, lump free pancake batter. Do not mix so long that you whip in air bubbles.
Never add extra water after mixing is complete. If the mix looks too thick, the ratio was wrong. Discard that batch and start fresh with the correct measurement.
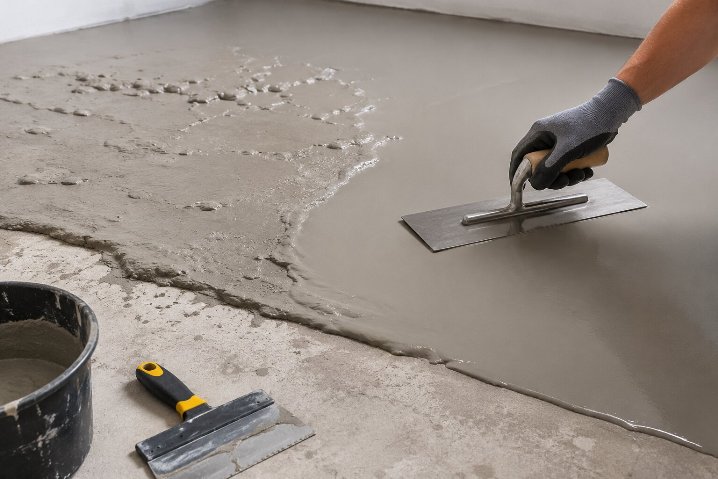
Step 7: Pour and Spread the New Compound
Pour immediately after mixing. Do not let mixed compound sit in the bucket. Start at the farthest corner from the exit and work toward the door.
Keep the pour bucket low to the ground to reduce splashing. Move the bucket along the floor as you pour rather than dumping from one spot.
Use a gauge rake (also called a notched spreader) to guide thickness and help the material flow into corners and edges.
Follow the manufacturer’s maximum depth per layer. Most products allow between 1/4 inch and 1 inch per single pour. For deeper repairs, pour in multiple layers and allow full cure between each one.
Run a spiked roller over the wet surface after spreading. This pops air bubbles and helps the compound settle flat.
Step 8: Control the Curing Environment
Temperature and humidity directly affect how the compound cures. Apply and cure between 50°F and 77°F (10°C to 25°C). Outside that range, the compound can set too fast, set too slow, or cure unevenly.
Close windows and doors to prevent drafts. Drafts create differential drying, which causes the surface to crack or curl at the edges.
Do not walk on the compound for at least 24 hours. Do not install flooring until the compound has fully cured, not just hardened on the surface.
Gypsum based compounds feel solid within a few hours but still carry internal moisture for several days. Installing flooring too soon traps that moisture and causes adhesive failure, warping, or mold.
Check Also: How to Test Whether You Have a Moisture Problem
Conclusion
Most self leveling compound mistakes are fixable. The right repair path depends on whether the compound bonded, how hard it cured, and what caused the failure in the first place.
Diagnose before you act, follow the prep steps in order, and give each layer enough time to cure before moving on.
A rushed repair re poured over a bad surface will fail in the same way, in the same spot, every time.