Key Takeaways
- Fix the water source before installing any barrier or liner.
- Use a 20-mil vapor barrier and overlap all seams by at least 12 inches.
- Seal all vents after encapsulation to stop humid outdoor air from entering.
- Add a dehumidifier to maintain humidity below 50% year-round.
- Test the sump pump every year to make sure it operates before a rain event.
What Crawl Space Waterproofing Actually Means
Crawl space waterproofing is the process of stopping water and moisture from entering the space beneath your home. It covers three problems: liquid water intrusion from rain or groundwater, water vapor rising from the soil, and humid air entering through open vents.
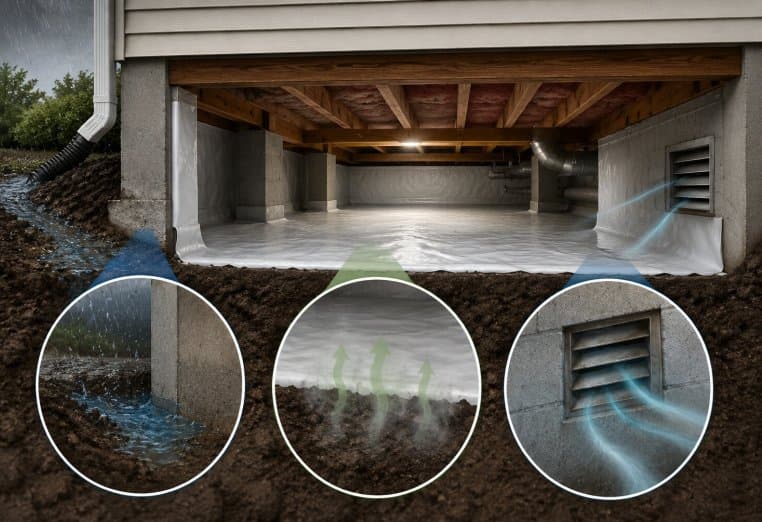
All three sources cause damage. Most homeowners only address one and wonder why the problem returns.
A fully waterproofed crawl space is dry, sealed, and protected from both water and air. This guide covers how to waterproof a crawl space completely, from inspection to final air sealing.
Why a Wet Crawl Space is a Serious Problem
A wet crawl space raises indoor humidity, feeds mold growth, and softens wood floor joists over time. Mold can begin growing on wet wood within 24 to 48 hours.
Moisture in a crawl space also raises energy bills. Wet insulation loses up to 40% of its rated R-value. That means your heating and cooling system works harder every month.
Crawl space water damage is not cosmetic. It is structural.
What You Need Before You Start
Gather these materials and tools before beginning:
- Heavy-duty flashlight and knee pads for inspection
- Moisture meter to test wood and soil readings
- 20-mil polyethylene vapor barrier sheeting
- Waterproof tape rated for vapor barriers
- Hydraulic cement or epoxy crack filler for foundation walls
- A sump pump with float switch (if standing water is present)
- A crawl space dehumidifier rated for the square footage of your space
- Closed-cell spray foam for vent and gap sealing
- Safety gloves, respirator mask, and protective eyewear
Check your local building code before starting. Some municipalities require permits for crawl space encapsulation.
Step 1: Inspect the Crawl Space and Find All Water Sources
Start by identifying exactly where water is entering. Crawl through the entire space with a flashlight. Look for standing water, wet soil, white mineral deposits on walls (called efflorescence), dark staining on wood joists, and cracks in the foundation wall.
Use a moisture meter on the floor joists. Any reading above 19% means the wood has absorbed enough moisture to support mold growth.
Mark every problem area before you do any work. Fixing symptoms without fixing sources wastes time and money.
What to Look for During Crawl Space Moisture Inspection
- Standing water or mud on the soil floor
- Rust stains beneath any pipe connections
- Sagging insulation between floor joists
- Visible mold or mildew on wood surfaces
- Condensation on pipes or the underside of the subfloor
Step 2: Remove Standing Water and Dry the Space
Remove any standing water before applying any materials. Use a wet/dry shop vacuum for small amounts. Use a submersible pump for larger volumes.
After removing water, run a high-capacity dehumidifier inside the crawl space for 48 to 72 hours. The goal is to bring relative humidity below 50%.
Do not install a vapor barrier over wet soil. Moisture trapped beneath the barrier will not evaporate. It will pool, breed bacteria, and damage the barrier from below.
Step 3: Fix Foundation Cracks and Wall Leaks
Water enters most crawl spaces through foundation wall cracks. Fill hairline cracks with hydraulic cement. It sets even when wet and blocks active water flow.
For larger cracks or gaps where the wall meets the footing, use an epoxy injection kit. These kits bond directly to concrete and create a waterproof seal rated for below-grade use.
Check the wall-to-floor joint along every wall. This joint is the most common entry point for groundwater in homes without exterior drainage systems.
How to Seal Foundation Wall Cracks Step by Step
- Clean the crack with a wire brush to remove loose material.
- Wet the crack slightly with water to help hydraulic cement bond.
- Mix hydraulic cement to a thick, putty-like consistency.
- Press it firmly into the crack and hold for 3 to 5 minutes until it sets.
- Smooth the surface flush with the wall using a trowel.
- Allow 24 hours before applying any waterproofing membrane over it.
Step 4: Install an Interior Drainage System If Needed
If your crawl space collects water regularly, a vapor barrier alone will not solve the problem. You need a drainage system to move water out before it accumulates.
Install a perimeter drain channel (also called a French drain) along the inside of the foundation walls. The channel sits below the vapor barrier and directs water to a sump pit. A sump pump then moves the water out of the crawl space through a discharge pipe.
A battery backup sump pump is worth the added cost. It keeps the system running during power outages, which often happen during heavy rainstorms when the pump is needed most.
Step 5: Install the Vapor Barrier on the Floor and Walls
A vapor barrier is a thick plastic sheet that covers the soil floor and crawl space walls. It stops ground moisture from evaporating into the space.
Use a 20-mil reinforced polyethylene liner for durability. Thinner 6-mil sheets tear easily and allow more vapor transmission.
How to Install a Crawl Space Vapor Barrier Correctly
- Start at one wall and unroll the liner across the floor.
- Overlap seams by at least 12 inches and seal them with vapor barrier tape.
- Run the liner 6 to 12 inches up every wall and tape it to the foundation.
- Cut around support columns and tape the liner tight against each one.
- Secure the liner to the wall with mechanical fasteners or construction adhesive.
- Do not staple the liner to wood joists. Staples create small holes that reduce effectiveness.
Cover 100% of the soil surface. Any exposed soil continues to release moisture into the air.
Step 6: Seal or Close All Crawl Space Vents
Open crawl space vents were once considered good practice. Building science research reversed that position. The IRC (International Residential Code) now allows sealed, conditioned crawl spaces as an alternative to vented ones.
Open vents let in warm, humid outdoor air. When that air hits the cooler surfaces inside the crawl space, the moisture condenses into liquid water. Sealing the vents removes that moisture source entirely.
Use rigid foam board cut to fit each vent opening. Seal all four edges with closed-cell spray foam. Then cover the interior side with the vapor barrier liner for a complete seal.
Should You Seal or Leave Open Crawl Space Vents?
Seal the vents. Vented crawl spaces in humid climates consistently show higher moisture levels than sealed ones. The old logic assumed outdoor air was always drier than crawl space air. In most U.S. climates, that assumption is wrong for most of the year.
Step 7: Insulate the Crawl Space Walls After Sealing
Once the space is sealed, insulate the foundation walls rather than the floor joists above. In a sealed crawl space, the walls are the thermal boundary. Insulating the floor joists instead creates a cold, unconditioned zone that wastes energy.
Use rigid foam board or closed-cell spray foam on the walls. Both materials resist moisture and do not absorb water. Fiberglass batt insulation is not appropriate for sealed crawl space walls because it absorbs moisture and loses performance.
The U.S. Department of Energy recommends R-10 minimum for crawl space walls in most climate zones.
Step 8: Install a Crawl Space Dehumidifier for Ongoing Moisture Control
Even a fully sealed crawl space can develop humidity from small air leaks and human activity. A dehumidifier rated for crawl space use keeps relative humidity below 50% year-round.
Choose a unit with a built-in humidistat and an auto-drain hose connection. This way it operates automatically and drains without manual emptying. Units sized for your square footage are listed in product specifications.
How Much Does Crawl Space Waterproofing Cost?
| Method | DIY Cost | Professional Cost |
|---|---|---|
| Vapor barrier only | $300 to $800 | $1,500 to $4,000 |
| Full encapsulation | $1,000 to $3,000 | $5,000 to $15,000 |
| Sump pump installation | $200 to $600 | $1,000 to $3,000 |
| Interior drainage system | $500 to $1,500 | $3,000 to $8,000 |
| Dehumidifier | $200 to $600 | $800 to $1,500 installed |
Full professional encapsulation costs more upfront but typically reduces HVAC energy costs by 15 to 25% annually.
Final Note
Crawl space waterproofing works when every step is completed in order. Drainage comes first, then crack repair, then the vapor barrier, then vent sealing, then insulation, then the dehumidifier.
Skipping any step reduces the effectiveness of every other step. Follow the sequence above and the space will stay dry.