The fastest way to prevent ice dams in gutters is to stop heat from reaching the roof. Seal the gaps that let warm air into your attic, add enough insulation on the attic floor, and let outside air flow under the roof.
Clean gutters and a few backup tools finish the job. This guide walks through each step in order.
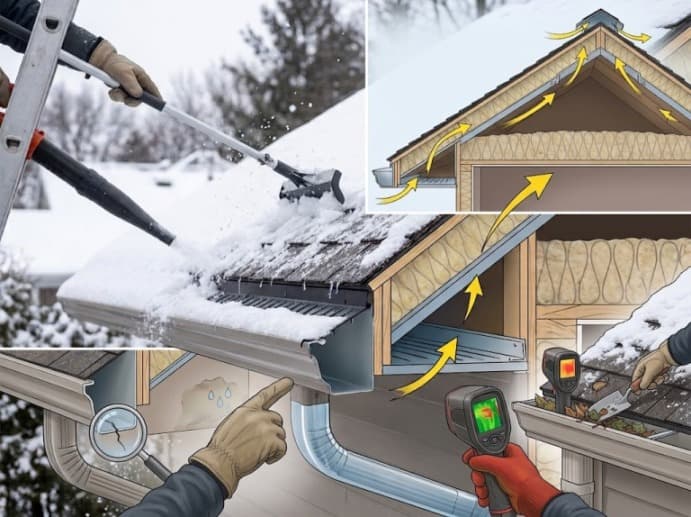
What Causes Ice Dams in Gutters?
Ice dams form when one part of the roof is warm and another part is cold. Heat from the house melts snow high on the roof, and the meltwater runs down to the eave, which is the lower edge of the roof.
The eave stays below freezing, so the water refreezes into a ridge that traps more water behind it.
The way to prevent ice dams in gutters follows directly from that cause. A dam needs the lower roof surface below 32°F and the upper surface above it, held for a long time.
Think of the roof as a bathtub with the drain plugged at one end. The water is not the problem. The plug is, and the plug is a strip of ice sitting right where your gutters hang.
Gutters are the victim here, not the cause. The heat flowing from the house, mostly through air leaks, creates the uneven roof temperatures that lead to dams. Snow cover and outdoor temperature then finish the job.
How Much Damage Can an Ice Dam Cause?
An ice dam can cost thousands of dollars. The average professional removal at $1,200, with a typical range of $650 to $2,400. Repairs add more, and roof leak repair alone runs from $400 to $24,000 depending on the damage.
Damage ranges from stained ceilings to soaked insulation, ruined drywall, and gutters pulled off the house.
Water trapped behind the dam finds any gap under the shingles. It soaks the insulation and framing below, and the moisture can lead to mold.
Insurance often pays for the resulting damage, but not always for the dam itself. Removing an ice dam is the homeowner’s responsibility. Check your policy before winter.
How to Prevent Ice Dams in Gutters: 6 Steps
To prevent ice dams in gutters, keep the underside of the roof as cold as the outdoor air.
Seal air leaks from the house into the attic, add insulation over the attic floor, open the airflow from soffit to ridge, and clear the gutters. Then add backup protection at the eaves.
The six steps below follow the path heat takes out of your house, from the living space up to the roof edge.
Work in order. Ventilation cannot fix an attic that is leaking warm air faster than it can exhaust it.
Step 1: Find Where Warm Air Enters the Attic
Start by locating the leaks. Go into the attic on a cold day with a flashlight, gloves, and a dust mask, and step only on the joists (the horizontal framing beams) so you do not break through the ceiling. Look for these common leak points:
- The attic hatch or pull down stairs often has no weatherstripping and no insulation on its cover.
- Ducts that run through the attic can leak warm air at their joints.
- Gaps around plumbing pipes, wiring, and the chimney framing let heated air rise straight up.
- Older recessed lights (can lights in the ceiling) pass a large amount of heat into the attic.
Dark streaks on insulation mark spots where air moves through it. Frost on the underside of the roof deck, which is the wood sheathing under the shingles, shows moist air is reaching a cold surface.
Step 2: Seal the Air Leaks Before Adding Insulation
Seal first, insulate second. To make the ceiling airtight so no warm, moist air flows into the attic, and only then to consider more insulation. Insulation slows heat that conducts through it, but it does not stop air that flows around it.
Use caulk or foam sealant around pipes and wires. Add weatherstripping to the attic hatch and glue a rigid foam cover to its top.
Seal duct joints with mastic (a thick duct sealant). Around a chimney or flue, use metal flashing and high temperature sealant, never ordinary foam.
Replace older recessed lights with sealed IC rated fixtures. IC stands for insulation contact, which means the fixture is safe to cover with insulation. If you have a whole house fan, cover it with an insulated box for the winter.
Step 3: Add Insulation to the Right R-Value
Add attic floor insulation until you reach the target for your climate zone. R-value is a measure of resistance to heat flow, and a higher number means better insulation. The table below shows the retrofit targets for existing wood framed homes.
| Climate zone | Attic with no insulation | Attic with 3 to 4 inches already |
|---|---|---|
| Zone 1 | R-30 | R-25 |
| Zones 2 and 3 | R-49 | R-38 |
| Zones 4A and 4B | R-60 | R-49 |
| Zones 4C, 5, and 6 | R-60 | R-49 |
| Zones 7 and 8 | R-60 | R-49 |
Most U.S. regions that get ice dams fall in zones 5 through 8. A licensed contractor can measure the R-value you have now and tell you how much to add.
Lay new insulation evenly across the attic floor, not against the roof. Keep it back from the eaves so it does not block the soffit vents in the next step.
Step 4: Open the Ventilation Path From Soffit to Ridge
Attic ventilation keeps the roof deck near outdoor temperature by pulling cold air in low and pushing warm air out high.
The soffit is the underside of the roof overhang, and the ridge is the peak. Air enters at the soffit vents and leaves at a ridge vent.
One square foot of net free ventilation for every 150 square feet of attic floor, split evenly between soffit and roof.
Net free ventilation is the open area left after screens and louvers. The same source calls a continuous ridge vent paired with a continuous soffit vent the best option.
Install ventilation baffles, which are foam or plastic chutes that sit between the rafters at the eaves.
Step 5: Clean Gutters and Downspouts Before the First Freeze
Clear all leaves, sticks, and debris from gutters and downspouts in late autumn. Clogged gutters hold water that freezes into a heavy block, and a clear gutter gives meltwater a path to leave the roof. Flush each downspout with a hose and confirm that water exits at the bottom.
Check that the gutters slope toward the downspouts and that the fasteners are tight. Ice weight can tear loose a gutter that was already sagging.
Clean gutters do not stop a dam caused by heat loss. They make sure the water that does melt has somewhere to go.
Step 6: Add Backup Protection at the Eaves
Backup measures limit damage if a dam forms anyway. Choose the ones that fit your roof and budget.
- Ice and water shield is a self sealing membrane installed under the shingles. It along the lower 3 feet of the roof and in valleys for new construction in heavy snow areas. Ask your roofer about it at your next reroof.
- Roof heating cables are a cheaper, temporary fix. They melt channels for water but do not correct the heat loss behind the problem.
- A roof rake removes snow from the lowest few feet of the roof after a storm. We uggests a roof rake or push broom. Stand on the ground and keep off an icy roof.
Conclusion
Ice dams in gutters start with heat leaking into the attic, so the fix starts inside the house. Seal the air leaks, insulate to the R-value for your climate zone, and keep the path from soffit to ridge open.
Clean the gutters before the first freeze, and treat ice and water shield, heating cables, and a roof rake as backup.
Finish the attic work in October or November, and you go into winter with a cold roof and clear gutters.