Key Takeway
- To seal a garage floor from moisture, clean the surface thoroughly, repair cracks, apply a concrete sealer or epoxy coating, and allow full cure time before use.
- Water vapor rising through concrete (called vapor transmission) is the most common source of garage floor moisture, not surface spills.
- Penetrating sealers (silane/siloxane-based) work best for stopping moisture from below; epoxy coatings work best for surface protection and durability.
- The full DIY process takes one to two weekends depending on drying time and the number of coats.
- Skipping surface preparation is the single most common reason garage floor sealers fail within the first year.
Why Your Garage Floor Gets Wet And What You Are Actually Fighting?
Moisture enters a garage floor from two directions: from above (spills, tracked-in rain, humidity) and from below (groundwater vapor pushing up through the concrete slab). The second source is the one most homeowners miss.
Concrete is porous by nature. It contains tiny capillaries that allow water vapor to travel upward from the soil beneath the slab, a process called vapor transmission (also called moisture vapor emission).
Even a floor that looks dry can be pushing moisture through at a rate that causes paint to peel, coatings to bubble, and mold to form along the base of walls.
Up to 70% of garage floor coating failures trace back to inadequate moisture testing and surface preparation before application. The floor looks fine. The sealer goes on. Six months later, it’s peeling.
Knowing what kind of moisture issue you have can help you find the right solution.
How to Test Your Garage Floor for Moisture Before Sealing
Test before you buy a single product. Sealing a floor with active moisture coming from below (without using the right product type) wastes both time and money.
The Plastic Sheet Test (ASTM D4263 Method)
This is the standard DIY moisture test for concrete slabs.
- Cut a 18-inch x 18-inch square of clear plastic sheeting.
- Tape all four edges tightly to the bare concrete using duct tape.
- Leave it in place for 24 hours (48 hours gives a more accurate reading).
- Lift the sheet and check for condensation on the underside or dark wet concrete beneath.
If you see moisture under the sheet, you have active vapor transmission from below. You need a penetrating sealer or a vapor barrier primer, not a standard epoxy coating.
If the concrete is dry under the sheet, surface-level moisture is your main concern and an epoxy or acrylic sealer works fine.
The Muriatic Acid Spot Test
Drip a small amount of diluted muriatic acid (one part acid to ten parts water) onto the concrete. If it fizzes, the surface is clean enough for a sealer to bond.
If it does not fizz, there is a contaminant layer (oil, old paint, or efflorescence) that needs to be removed first. Efflorescence is a white mineral deposit that forms when water carries salts to the concrete surface.
What Type of Garage Floor Sealer Should You Use
The right sealer depends on your moisture source, your budget, and how you use the garage. There are four main types used for moisture control.
| Sealer Type | Best For | Stops Vapor From Below? | Avg. Coverage (sq ft/gal) | Recoat Interval |
|---|---|---|---|---|
| Penetrating silane/siloxane | Below-slab vapor transmission | Yes | 100-200 | Every 3-5 years |
| Epoxy coating | Surface protection + light moisture | Partial | 200-400 | Every 5-10 years |
| Polyurethane coating | High-traffic floors, chemical resistance | No | 300-400 | Every 3-7 years |
| Acrylic sealer | Low-budget, light-use garages | No | 200-400 | Every 1-3 years |
Penetrating sealers soak into the concrete and chemically react with it to fill the capillaries from the inside. They do not change how the floor looks. They are the best choice when your plastic sheet test shows moisture coming from below.
Epoxy coatings form a hard surface layer on top of the concrete. They are durable and look clean, but if vapor pressure from below is high, the coating can delaminate (separate from the surface in sheets or bubbles) within months. For epoxy to last, the floor must pass the moisture test first.
Acrylic sealers are the easiest to apply and the least expensive, but they wear faster and offer minimal protection against vapor transmission. They work for low-use garages in dry climates.
What You Need Before You Start Sealing
Gather every item before opening a product. Starting mid-job to make a supply run lets moisture and dust contaminate a freshly prepped surface.
Tools:
- Pressure washer or stiff-bristle scrub brush
- Concrete grinder or floor buffer with 40-grit diamond pad (for heavy contamination)
- Paint roller with 3/8-inch nap sleeve and extension pole
- Paintbrush (3-4 inch) for cutting in edges
- Shop vacuum
Materials:
- Concrete degreaser (TSP or alkaline-based cleaner)
- Concrete crack filler (polyurethane or epoxy-based)
- Your chosen sealer (calculate square footage before buying)
- Painter’s tape
- Safety goggles, chemical-resistant gloves, knee pads
Conditions needed:
- Air temperature between 50°F and 85°F during application and cure.
- No rain forecast for 24-48 hours after application.
- Relative humidity below 85% during application.
Applying sealer when it is too cold, too hot, or too humid causes adhesion failure. Check your local forecast before scheduling the job.
How to Seal a Garage Floor from Moisture: Step-by-Step
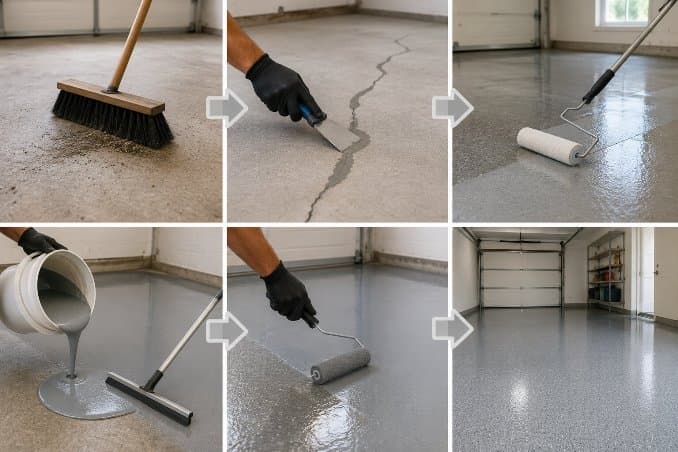
Sealing a garage floor from moisture takes five main steps: clear and clean the floor, test for moisture, repair damage, apply the sealer, and allow it to cure fully. Skipping or rushing any step reduces how long the seal lasts.
Step 1: Clear the Floor and Degrease the Concrete
Move everything out of the garage. Sweep the entire floor to remove loose dirt and debris.
Apply a concrete degreaser to the full surface. Let it sit for 10-15 minutes, then scrub with a stiff brush and rinse thoroughly with a pressure washer.
Oil contamination, which is common in garages, prevents sealers from bonding to the concrete. One degreasing pass is sometimes not enough; repeat if dark stains remain.
Let the floor dry completely. This usually takes 24 hours with good ventilation. Run a box fan if needed.
Step 2: Test for Moisture (Plastic Sheet Test)
Tape the plastic sheet to the clean, dry concrete as described above. Wait 24-48 hours. Note the result before buying or mixing any product.
If moisture is present below the slab, buy a penetrating silane/siloxane sealer. If the floor is dry, proceed with your preferred coating type.
Step 3: Repair Cracks and Spalled Areas
Spalling refers to surface flaking or pitting in concrete caused by freeze-thaw cycles or moisture damage. Fill all cracks wider than 1/8 inch with a polyurethane or epoxy crack filler. Use a putty knife to press filler into the crack flush with the surface.
Let filler cure per the product instructions (typically 4-6 hours for polyurethane, 24 hours for epoxy filler). Sand flush if needed. Vacuuming away all dust after this step is important – dust sitting in a crack creates a weak point in adhesion.
For large spalled areas or a surface with significant pitting, etch the entire floor with a diluted muriatic acid solution (one part acid to ten parts water). Rinse thoroughly and allow to dry. Etching opens the concrete pores for better sealer penetration.
Step 4: Apply the First Coat of Sealer
Tape off the base of walls and any floor drains. Pour the sealer into a paint tray.
Cut in the edges along all walls with a brush first, then roll the sealer across the main floor using a 3/8-inch nap roller. Work in 4-foot-wide strips from the back of the garage toward the door so you do not paint yourself into a corner.
Apply thin, even coats. A thick single coat takes longer to cure and is more likely to bubble or peel than two thin coats.
Allow the first coat to dry for the time listed on the product label, typically 4-8 hours for penetrating sealers and 12-24 hours for epoxy.
Step 5: Apply the Second Coat and Allow Full Cure
Apply the second coat in the same way, working perpendicular to the first coat direction. Cross-rolling improves even coverage.
Do not walk on the floor until it is dry to the touch (usually 24 hours). Do not park a car on the floor until it has fully cured, typically 72 hours for most sealers and up to 7 days for epoxy. Driving onto a partially cured epoxy coating leaves tire marks that do not come out.
How Long Does a Garage Floor Sealer Last
How long a garage floor sealer lasts depends on the product type, how much traffic the floor gets, and whether it was applied correctly.
Penetrating sealers last 3-5 years on average. Epoxy coatings last 5-10 years with proper prep. Acrylic sealers wear fastest, typically needing a refresh every 1-3 years.
Signs your sealer needs reapplication:
- Water no longer beads on the surface (it spreads and soaks in instead).
- The floor feels rough or looks dull in high-traffic areas.
- You notice white powdery deposits (efflorescence) forming near the edges or cracks.
- Small bubbles or lifting sections appear in a coated floor.
Check the floor every spring. Catching wear early means a light cleaning and one recoat, not a full strip-and-redo job.
How to Keep a Sealed Garage Floor Dry Long-Term
Sealing the floor handles moisture from below. A few additional steps stop moisture from working back in from above and around the perimeter.
- Seal the gap between the garage door and the floor with a door bottom seal or threshold seal. This blocks rainwater from running in during storms.
- Improve ventilation by adding a wall vent or exhaust fan. A garage that holds humid air encourages condensation on cool concrete, especially in spring and fall.
- Check the perimeter grading outside the garage. Ground that slopes toward the garage directs runoff straight under the door. The soil should slope away from the building at a rate of 1 inch per foot for at least 6 feet.
- Install a dehumidifier in climates with high ambient humidity. A 30-pint unit handles most standard two-car garages.