Woodworm is not a single insect. It is the damage left behind by the larvae of several wood boring beetle species, with the Common Furniture Beetle being the most frequent culprit in homes.
The adult beetle lays eggs in cracks, joints, and old flight holes in the wood. When the eggs hatch, the larvae burrow straight into the timber and feed there for years before emerging as adults.
Woodworm favors softwoods such as pine and spruce, though hardwoods including oak and mahogany can also be affected once the surface finish wears down. Damp, poorly ventilated conditions make an infestation far more likely, since larvae thrive in wood with a higher moisture content.
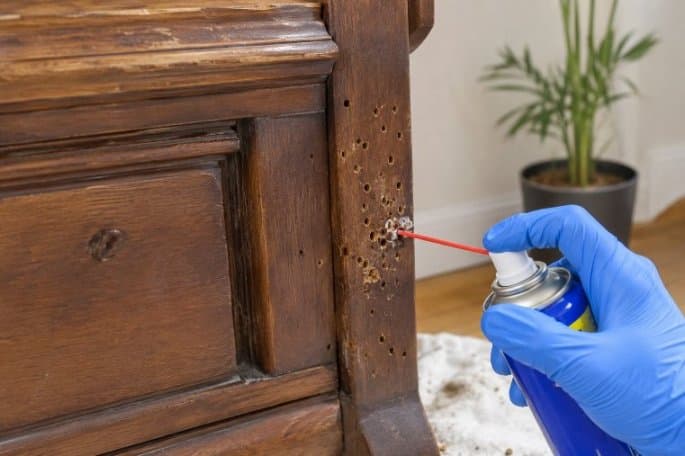
How to Identify Woodworm in Furniture
The first sign most people notice is a cluster of small, round holes on the surface of a chair leg, drawer base, or cabinet back. These flight holes are usually 1 to 2mm across and mark the point where an adult beetle has chewed its way out.
Look for these signs together, since one alone is not always conclusive:
- Fresh, pale colored holes with sharp edges, which suggest recent activity rather than old, treated damage.
- Fine powdery frass sitting in or beneath the holes, often visible when you tap the wood gently.
- Soft, crumbly, or spongy patches of wood, particularly around joints and legs.
- Adult beetles seen crawling on or near the furniture, most commonly between April and September.
- Tunnels visible if you look inside a damaged joint or a piece that has already broken.
Check the ply backs of wardrobes, the undersides of drawers, and any wicker or cane elements first, since these areas are common starting points for an infestation.
How to Treat Woodworm in Furniture Step by Step
Treating woodworm promptly prevents internal structural damage and stops the insects from spreading to other furniture or structural wood in your home.
Step 1: Confirm the Infestation is Active
Old, dark, filled in holes usually mean past damage that was already treated. Fresh, pale, clean edged holes with loose frass nearby point to a live infestation.
If you are unsure, cover a suspected area with light colored tape for a few weeks and check for new dust or holes appearing.
Step 2: Clean the Surface Thoroughly
Vacuum or brush away all frass and dust from the holes and surrounding wood. This removes debris that can block treatment fluid from reaching the larvae and makes it easier to see where new activity appears.
Step 3: Remove Any Varnish or Finish Where Needed
For a heavier infestation, strip back varnish, paint, or wax from the affected area.
Treatment fluids work by soaking into bare wood, so a sealed finish can stop the product from reaching the tunnels underneath.
Step 4: Apply a Woodworm Treatment Fluid
Use a borate or permethrin based woodworm killer, available as a liquid, gel, or aerosol spray.
Inject the fluid directly into each flight hole using the fine nozzle most products include, then brush or spray the surrounding wood so the fluid can soak in.
Step 5: Repeat and Monitor
A single application does not always kill every larva, since some may be too deep in the timber.
Reapply after the period stated on the product label, and keep checking for fresh holes or frass over the following months.
Step 6: Repair the Damage
Once you are confident the infestation is dead, fill the holes with wood filler or a color matched wax stick.
For structurally weakened joints or legs, consider reinforcing or replacing the piece rather than filling over a weak point.
Step 7: Prevent Reinfestation
Keep furniture in a well ventilated, dry room, since woodworm needs a moisture rich environment to thrive.
Regularly inspect older or antique pieces, especially in storage areas like attics, basements, and garages.
DIY Treatment vs Professional Treatment
| Factor | DIY Treatment | Professional Treatment |
|---|---|---|
| Best for | Small, localized infestations on one item | Widespread, structural, or repeated infestations |
| Cost | Low, a bottle of treatment fluid | Higher, includes inspection and labor |
| Time | A few hours plus follow up checks | Usually completed in one visit with a warranty |
| Tools needed | Woodworm fluid, brush, filler | Specialist insecticides and equipment |
| Guarantee | None | Often comes with a written guarantee |
| When required | Furniture only, wood not load bearing | Floorboards, joists, or beams affected |
Conclusion
Woodworm damage looks alarming, but most infestations in furniture are manageable once you know what to look for.
Confirm the holes are active, clean the wood, apply a proper treatment fluid, and give it time to work before repairing the surface.
Save the call to a professional for structural timber or infestations that keep coming back after treatment.